Stream PC Games to your RetroPie with GameStream and Moonlight

You already have RetroPie running nicely on your Raspberry Pi. It’s the perfect retrogaming experience for your living room TV, but there’s one thing missing. The Pi doesn’t have the horsepower for more recent games. How can you play the latest PC releases? Or perhaps you fancy some PlayStation 2, Gamecube or Dreamcast emulation on the big screen?
Moonlight fits the bill. It streams gameplay from your almighty PC to the RetroPie, allowing you to sit back on the couch and play games that need a bit more grunt
Here’s how to get it setup!
What you need
- Raspberry Pi with RetroPie installed. For best performance use a Raspberry Pi 3 Model B+
- Wi-Fi connection or (for best streaming performance) Ethernet cable
- USB keyboard. To edit config files on your Raspberry Pi. Alternatively you can do this from your networked PC via SSH. Find more details in this RetroPie guide
- A gaming PC with NVIDIA GeForce GTX/RTX 600+ series GPU (GT-series and AMD GPUs aren’t supported by NVIDIA GameStream) and NVIDIA GeForce Experience (GFE) 2.1.1 or higher installed
Connecting to your Pi
Many of the steps in this guide involve tinkering with RetroPie settings at the command line
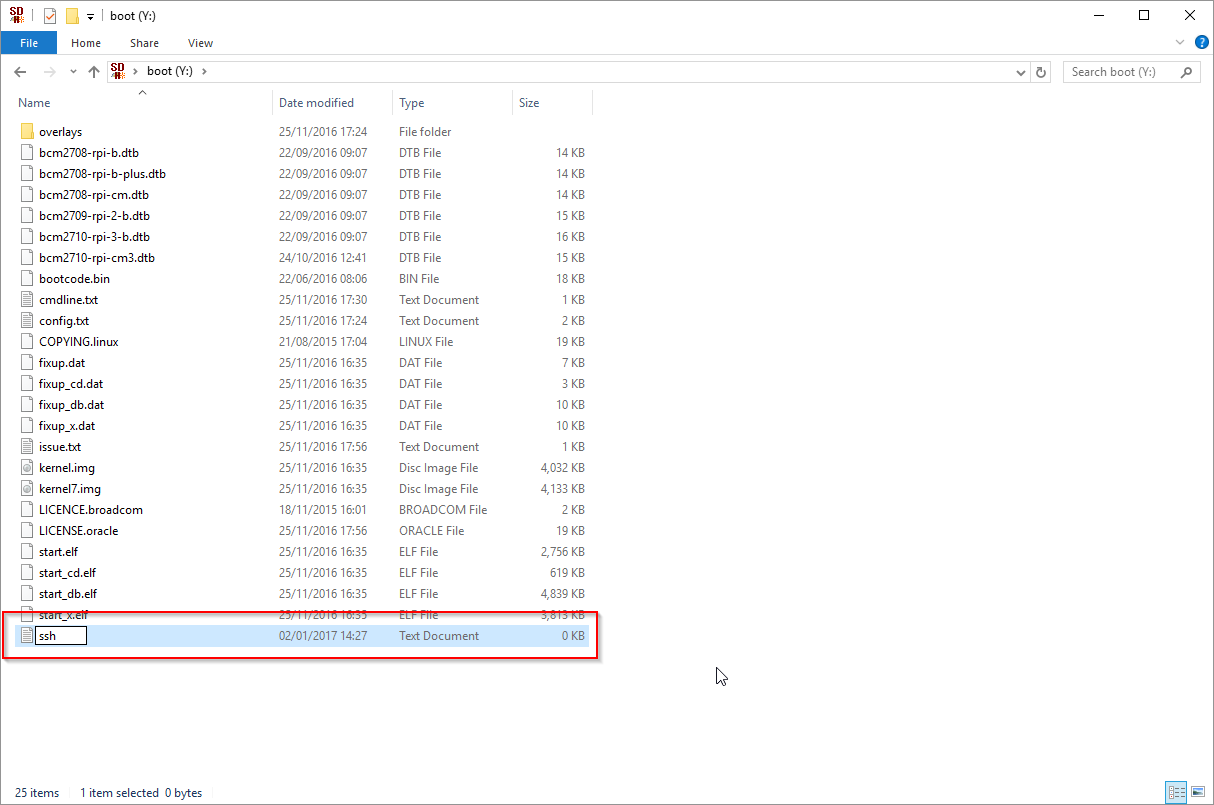
Create a file named ssh in the root directory of your SD Card. This way you can configure RetroPie from your networked PC, no keyboard required. Learn more here
With this feature enabled, you can use any SSH client (I like PuTTY) to remotely connect to your Pi. The default connection details:
- Hostname:
retropie - Username:
pi - Password:
raspberry
Alternatively, you can use a USB keyboard to configure Retropie directly
Install Moonlight on your Pi
Step 1. Update Sources
On your Pi:
-
Quit Emulation Station (hit the Start button and navigate to
Quit > Quit EmulationStation) -
Update sources file
From the bash prompt, type sudo nano /etc/apt/sources.list. This will launch the nano text editor. Add the following line at the bottom of the file:
deb http://archive.itimmer.nl/raspbian/moonlight stretch mainMake sure there is a carriage return below at the bottom of the file. Then hit Ctrl+X then Y to save and exit
Step 2. Install GPG key
Still at the bash prompt, enter the following to fetch and install the GPG key for Moonlight:
wget http://archive.itimmer.nl/itimmer.gpg
sudo apt-key add itimmer.gpg
Step 3. Install Moonlight
We’ll use apt-get to install Moonlight. Enter the following:
sudo apt-get update
sudo apt-get install moonlight-embedded
This should install Moonlight globally. In case anything goes wrong, you can find extra troubleshooting steps here
Connect Moonlight to your PC
Run the following command to pair Moonlight with your PC
moonlight pair <your PC IP address or hostname>For example:
moonlight pair homePCYou’ll be asked to enter key on your host PC. Enter that once and the RetroPie is paired forever
Optimize controller settings
If you’re using an Xbox 360 controller on the Pi, we need to manually change some controller settings. The xpad driver that RetroPie uses leads to weird effects in moonlight
Type the following in bash:
sudo rmmod xpad
sudo modprobe xpad triggers_to_buttons=0
This (temporarily) unloads the xpad driver and disables the “triggers to buttons” feature - allowing you to use triggers properly when you stream games via Moonlight. We’ll need to revert this setting or reboot before we use Emulation Station again, since this setting will break retro gaming. Later on we’ll create a script to help here. Find more info on this issue here
Run a test stream
Enter the following at the command prompt:
moonlight stream -1080 -fps 60 -app "<name of a game to stream from GeForce Experience>" <your PC IP address or hostname>For example:
moonlight stream -1080 -fps 60 -app "Forza Motorsport 6 Apex" homePCAll going well, the game should launch at 1080p, 60fps and be playable on your Pi! Great success!
Power up your Pi
If you have a slower Pi model, you may experience some lag when streaming at 1080p, 60fps. You can either lower the resolution or overclock your Pi:
sudo nano /boot/config.txtThis will open a text editor. Add the following at the bottom of the file:
# To enable smooth 1080p60 gameplay in Moonlight
force_turbo=1
h264_freq=333
Press Ctrl+X then Y to save and exit, the enter the following to reboot your Pi and apply the change:
sudo rebootYour streaming experience should now be lag free
Integrate with EmulationStation
We can launch Moonlight from the command line, but we’d much prefer to launch and stream games directly through the RetroPie EmulationStation interface. Luckily EmulationStation is very configurable. We can do this without too much hassle.
Step 1. Add a new System in EmulationStation
You need to add “Moonlight” as a new System before it’ll appear in the RetroPie navigation menu
-
Quit EmulationStation if it is open (hit the Start button and navigate to
Quit > Quit EmulationStation) -
Create a copy of the ES config (the default one gets overwritten during ES updates and you don’t want that)
sudo cp /etc/emulationstation/es_systems.cfg /opt/retropie/configs/all/emulationstation/es_systems.cfg- Add a system to the custom config:
sudo nano /opt/retropie/configs/all/emulationstation/es_systems.cfg- Add this at the bottom, but before
</systemList>:
  <system>
    <name>Moonlight</name>
    <path>~/RetroPie/roms/moonlight</path>
    <extension>.txt .TXT</extension>
    <command>/opt/retropie/supplementary/runcommand/runcommand.sh 0 _SYS_ moonlight %ROM%</command>
    <theme>Moonlight</theme>
  </system>
Step 2. Register games with EmulationStation
You need to register each GameStream game you want to stream via a textfile:
cd /home/pi/RetroPie/roms
mkdir moonlight
cd moonlight
touch MYGAMENAME.txt
Where MYGAMENAME is the exact game name defined in GeForce Experience / Gamestream on your PC (e.g Forza Motorsport 6 Apex.txt). Repeat this for each game you wish to stream via Moonlight
Step 3. Add Moonlight config and startup/shutdown scripts
- Create a config directory for Moonlight:
cd /opt/retropie/configs
mkdir moonlight- Edit emulators.cfg config file:
cd moonlight
sudo nano emulators.cfg- Add these two lines to the file. Replace
homePCwith the hostname or IP address you paired earlier:
moonlight = "moonlight stream -1080 -fps 60 -app %BASENAME% homePC"
default = "moonlight"- Create startup script for Moonlight games:
cd /opt/retropie/configs/all
sudo nano runcommand-onstart.sh- Add the following content to the file:
# Set joypad to support triggers when loading Moonlight games
if [ $1 = "moonlight" ]; then
   sudo rmmod xpad
   sudo modprobe xpad triggers_to_buttons=0
fi- Create shutdown script for Moonlight games:
cd /opt/retropie/configs/all
sudo nano runcommand-onend.sh- Add the following content to the file. Again, replace
homePCwith the hostname or IP address you paired earlier:
# Revert joypad to regular settings and terminate Moonlight stream
if [ $1 = "moonlight" ]; then
   sudo rmmod xpad
   sudo modprobe xpad triggers_to_buttons=1
   moonlight quit homePC
fi
Get streaming!
You’re good to go! Reboot your Pi via sudo reboot and launch your streams direct from EmulationStation
To end a stream hit Select + Start + L1 + R1. You’ll be returned to the EmulationStatio menu
Happy streaming!
Optional: create a custom theme for Moonlight
Want to show custom box art or metadata for your GameStream games? You’ll need to modify the EmulationStation them
-
Quit EmulationStation if it is open (hit the Start button and navigate to
Quit > Quit EmulationStation) -
Create a copy of the default “carbon” theme - you don’t want to break it
cd /etc/emulationstation/themes
sudo cp -r carbon carbon-updated- Follow this guide to modify the theme to your liking
FAQ
Can I stream Windows Store aka UWP games?
Some UWP are already “GameStream onboarded” by NVIDIA and will magically appear in GeForce Experience. Others must be added via the GameStream UI (it has native support for UWP)
Can I stream the Xbox Companion app from my Windows 10 PC to Play Xbox One games on my Pi?
Yes you can and it works surprisingly well. Although it’s better to do this via a single hop (i.e. direct to a Windows 10 machine or a Mac/iOS device via OneCast)
Troubleshooting
Help! The controller stopped working
I encountered this occasionally. Quit the stream (Select + Start + L1 + R1) and try again
I can hear sound but no visuals?
If you hear sound but see a black screen when streaming, try connecting to your GameStream PC with another Moonlight client (e.g. PC or phone). This should fix the issue
Comments