Although AdLib audio is the synth standard for DOS-gaming, many games include support for vastly superior MIDI audio.
In 2021, it’s cheap and easy to add MIDI music to your DOS gaming PC. Here’s how.
What you need
We’ll use a Rasberry Pi and the mt32-pi software synthesizer to build a cheap MIDI applicance – which we’ll hook up to our DOS gaming PC via the serial port.
Hardware and software you need:
- Raspberry Pi 3
- microSD card
- RS232 to TTL converter module (e.g. this one)
- SoftMPU
- mt32-pi control (optional)
Step 1 – Install mt32-pi
Follow these quick steps to install and configure mt32-pi on your Pi.
Step 2 – Update port settings
Mount your microSD card to edit the mt32-pi configration file (mt32-pi.cfg). Replace the following line:
gpio_baud_rate = 31250
With this:
gpio_baud_rate = 38400
Our PC serial port can’t run at the standard MIDI baud rate of 31250bps. Instead we tell our mt32-pi to use 38400bps – the closest “PC standard” baud rate.
Save mt32-pi.cfg and insert the microSD card back into your Pi once complete.
Step 3 – Connect hardware
Wire the serial converter module to the GPIO pins on your Raspberry Pi:
| Converter pin | Raspberry Pi GPIO pin |
| VCC | 1 (3.3V) |
| GND | 6 (GND) - or any other GND pin |
| RXD | 10 (UART RXD) |
| TXD | 8 (UART TXD) |
Find more detail on the mt32-pi wiki here.
Once you’re fully-wired:
- Connect the converter module to your DOS PC serial port
- Connect speakers / headphones to the Pi audio jack
- Power-on the Pi and PC
Step 4 – Start SoftMPU
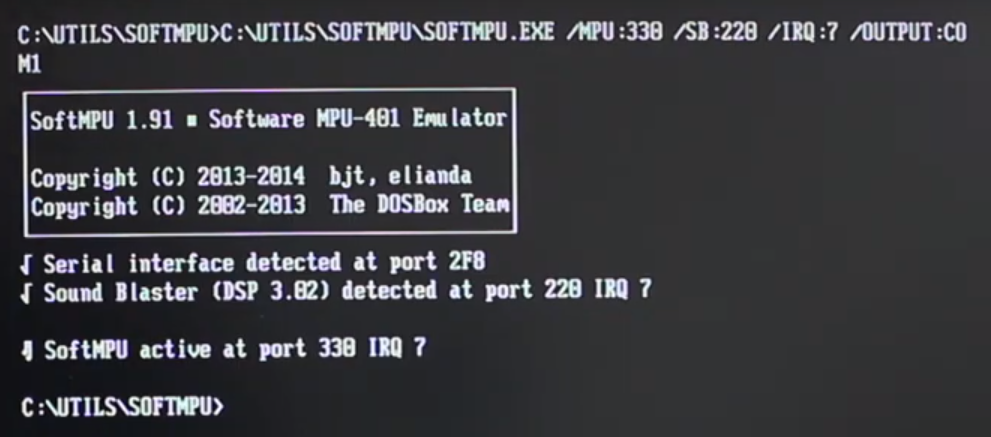
Copy SoftMPU to your DOS PC and run it with the following parameters:
SOFTMPU.EXE /MPU:330 /SB:<Your Sound Blaster Port> /IRQ:<Your Sound Blaster IRQ> /OUTPUT:COM1
For example:
SOFTMPU.EXE /MPU:330 /SB:220 /IRQ:7 /OUTPUT:COM1
SoftMPU will detect your PC serial port and create a “Soft” MIDI interface that your games use for MIDI playback:
Step 5 – Switching Modes
mt32-pi has two synth modes:
- MT-32 mode (for games that support Roland MT-32 audio)
- Soundfont mode (for games that support General MIDI or Roland Sound Canvas audio)
MT-32 support was common in the early 90s, but was gradually superseded by General MIDI. With both together the mt32-pi supports a very wide range of games.
Which mode your Pi boots into is controlled via the mt32-pi configration file (mt32-pi.cfg). Amend the following line:
default_synth = mt32 (for Roland MT-32)
default_synth = soundfont (for General MIDI / Roland Sound Canvas)
To change modes “on the fly”, use mt32-pi control.
Step 6 – Play games!
You’re ready to play!
For beautiful music, configure your games to use Roland MT-32, Roland Sound Canvas or General MIDI audio on Port 330.
Notes
- Games that use DOS extenders (e.g. DOS/4GW) will not work with this “Serial MIDI” approach. Doom is a notable example. This is a limitation of SoftMPU.
- To increase compatibility you’ll need a hardware MPU-401 interface, usually provided by your PC Sound Card or dedicated hardware like PCMIDI. You’ll also need a MIDI interface for your Pi – learn more here.
- The Raspberry Pi audio jack is not designed for high quality. If you want better quality audio output, consider adding your own DAC.
Moving Beyond Serial MIDI
To move beyond the limitations of Serial MIDI, you can purchase a MIDI “hat” for the Pi. These attach to the Pi’s GPIO pins and provide a traditional MIDI input/output interface.
Together with mt32-pi, this allows you to create a DIY MIDI synthesiser with similar sound and features to classic synths like the Roland MT-32 or SC-88. A great combo for DOS gaming!
For more details see my PI-MIDI review.
More MIDI articles
- PI-MIDI Review – Supercharge your mt32-pi - 04 Jun 2022
- DreamBlaster X2GS – A New MIDI Challenger? - 02 Oct 2021
- mt32-pi – Testing out New USB Serial Support - 25 Jul 2021
- Get the Best MS-DOS Audio With mt32-pi - 03 May 2021
- MiSTer AO486 Core Part 8 – Roland MT-32, Sound Canvas Audio via MidiLink - 28 Mar 2021
- Games With MIDI. The Atari ST Never Sounded So Good! - 19 Jun 2019
Comments