Update 2021-10-16: Thanks to recently published upgrade instructions, it’s now possible to upgrade previously unsupported TPM 1.2 PCs to Windows 11. Learn more here.

A quick post on Trusted Platform Modules (TPMs).
I recently rushed to buy and install one after learning that Windows 11 requires a TPM to run. I learned a lot in my (ultimately failed) quest to make my PC Windows 11 compliant. Details below.
What is a TPM?
A TPM chip communicates with other security systems in your PC, handling security-sensitive operations like key creation/storage and keeping a watch on system integrity. This makes life more difficult for a potential hacker.
Broadly there are two types of TPM:
- Discrete TPMs are dedicated chips that sit on your motherboard, either soldered-on or connected via special “TPM header” pins
- Firmware TPMs (“fTPMs”) are part of your CPU
There are also two TPM specifications: TPM 1.2 and the newer TPM 2.0. TPM 2.0 targets many of the same use cases and features but is not backward compatible with TPM 1.2.
More details on Wikipedia here.
Why do I need a TPM for Windows 11?
Microsoft is looking to improve security and reliability in Windows 11, and TPM is part of this push. In their own words:
"Windows 11 raises the bar for security by requiring hardware that can enable protections like Windows Hello, Device Encryption, virtualization-based security (VBS), hypervisor-protected code integrity (HVCI) and Secure Boot. The combination of these features has been shown to reduce malware by 60% on tested devices. To meet the principle, all Windows 11 supported CPUs have an embedded TPM, support secure boot, and support VBS and specific VBS capabilities."
Do I have a TPM already?
To check if you have a TPM:
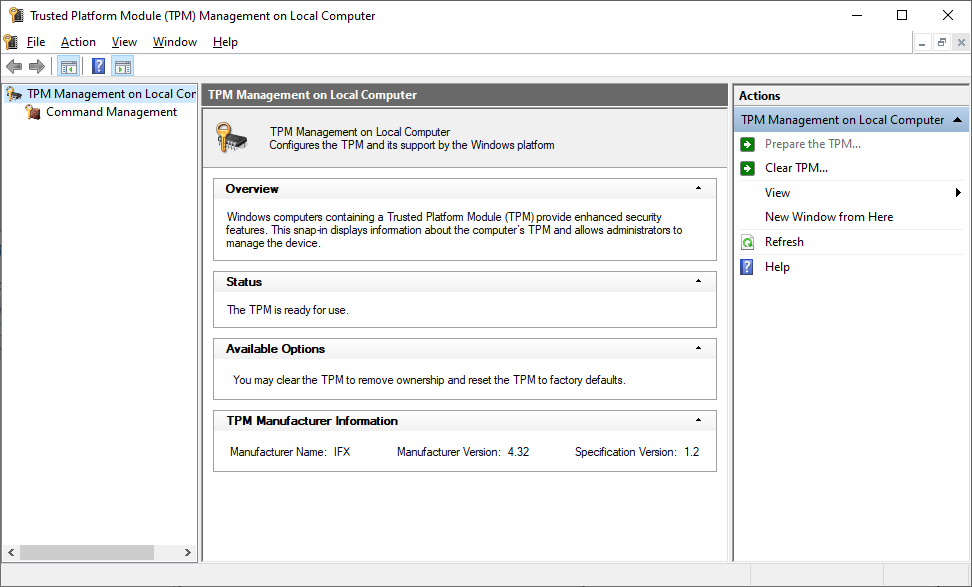
From Windows, navigate to Start → tpm.msc
- If you see “The TPM is ready for use”, you’re good to go – no further action required
- If you see “Compatible TPM cannot be found”, you either don’t have a TPM, or don’t have your TPM enabled
If your CPU is Intel Skylake (2015), Ryzen Zen+ (2000 Series) or newer, you likely have a Firmware TPM and just need to enable it in your BIOS - look for Intel PTT or AMD PSP fTPM.
If your CPU is older (like my i7-4770K), you’ll have to buy a Discrete TPM for your motherboard.
Can I install a Discrete TPM?
To check if you have a compliant motherboard:
- Check your motherboard documentation. Look for TPM or Trusted Platform Module
- Locate the TPM header on your motherboard and count the pins
There are many different Discrete TPM pinout standards and you’ll need to find the correct one. The common standards are:
- TPM/FW3.19 (20-1 pins) - TPM 1.2
- TPM-L R2.0 (20-1 pins) - TPM 2.0
- TPM-M R2.0 (14-1 pins) - TPM 2.0
I have an Asus Z87-PRO motherboard. After some research I bought this module for $7:

You also need to verify Secure Boot and UEFI support:
- Go to your BIOS.
- Look for Secure Boot and UEFI options
If you have all the above, you’re good to go
Preparing your system for a TPM

Before you install/enable the TPM, check the System Information app in Windows (Start -> msinfo32). If you have “BIOS Mode” = Legacy and “Secure Boot State” = Unsupported, you need to fix that first:
- In Windows, go to
Settings→Recovery Pane→Advanced Startup→Restart Now - Choose
Troubleshoot→Advanced Options→Command Prompt - Type
MBR2GPT /validate. If all goes well you should see “Validation completed successfully” - Next type
MBR2GPT /convert. This will convert your Windows install from Legacy to UEFI - Reboot your PC, enter the BIOS, enable UEFI and Secure Boot
- Save changes and load Windows. System Information should now show “BIOS mode” = UEFI and “Secure Boot State” = On

Install and enable the TPM
With UEFI and Secure Boot fully enabled, you’re ready to install/enable the TPM:
- (For Discrete TPM only) Shut down your PC and fit the TPM to your motherboard
- Power-on your machine and re-enter the BIOS. Find the “TPM” feature and enable it
- Save BIOS changes and load Windows.
- Again navigate to
Start→tpm.msc. All going well, you should see “The TPM is ready for use”
Congratulations, you’ve successfully installed a TPM!
I’ve installed a TPM! Can I use Windows 11?
Unfortunately Windows 11 compatibility is more complicated than just TPM – and Microsoft has already amended the minimum System Requirements a few times since their initial announcement.
- Currently, TPM Version 2.0 is required. Some older motherboards (like mine) only support TPM 1.2
- Even if you have TPM 2.0, the Windows 11 CPU requirements have also been confirmed as minimum Intel 8th-gen or Ryzen 2000 architecture. My old machine is plain out of luck!
To check your own machine, download and run the Windows 11 PC Health Check app. It will run a diagnostic and provide a compatibility summary for you:

This was a fun journey and I learned a lot about TPM! Hope you find this post useful too!
Comments